技術チーム
技術チーム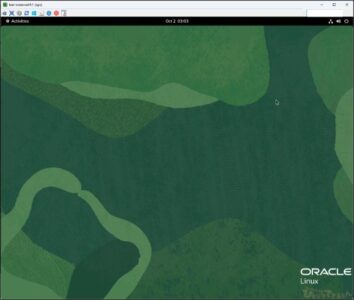
はじめに
みなさま、こんにちは。
Oracle Cloud Infrastructure 検証チームです。
今回は、Ultra VNC Viewerを使ってOCIに構築したOracle Linux 9をGUI操作できるよう検証してみました。
検索してもあまりヒットしないOracle Linux 9上で行ったOS設定をメインに記載しました。
参考元:Install the VNC Remote Access Server on Oracle Linux
単語をチェックして、もっと賢くなっちゃおう!

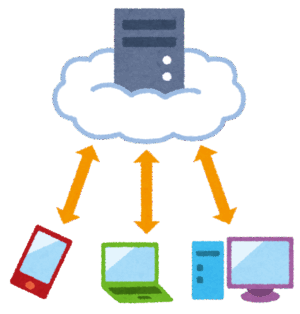
構成
- 自身のPCにインストールしたUltra VNC Viewerからパブリックサブネットに構築したインスタンスに、port 5901/tcpで接続します。
- 以下構成図で検証していきます。

手順
1. 前提
以下の事前構築・設定は完了している状態から作業を開始します。
インスタンス
1-1. VCN・パブリックサブネット・インスタンス等の構築
1-2. セキュリティ周りのファイアーウォール(port22/tcpとport 5901/tcp)開放やルート表の設定
自身のPC
1-3. Tera Termのインストール
1-4. Ultra VNC Viewerのインストール
2. GUI環境のインストール
インスタンス
Tera TermでインスタンスにSSH接続して、opcユーザで色文字コマンドを実行・入力します。
2-1. GNOME デスクトップ環境とすべての依存関係をインストール
[opc@test-instance01 ~]$ sudo dnf group install -y "Server with GUI"
Ksplice for Oracle L・・(略)
Is this ok [y/N]:y
Downloading Packages:
・・(略)
Complete!
[opc@test-instance01~]$
2-2. デフォルトのユーザーログインタイプをグラフィカルモードに設定し、設定反映の為OS再起動
[opc@test-instance01 ~]$ sudo systemctl set-default graphical
Removed "/etc/systemd/system/default.target".
Created symlink /etc/systemd/system/default.target → /usr/lib/systemd/system/graphical.target.
[opc@test-instance01 ~]$  sudo reboot
2-3. Waylandを無効にして X.org を使用するよう設定
[opc@test-instance01 ~]$ sudo sed '/^#WaylandEnable/s/^#//g' /etc/gdm/custom.conf
# GDM configuration storage

[daemon]
# Uncomment the line below to force the login screen to use Xorg
WaylandEnable=false

[security]

[xdmcp]

[chooser]

[debug]
# Uncomment the line below to turn on debugging
#Enable=true

[opc@test-instance01 ~]$

3. VNCサーバーインストールとパスワード設定
インスタンス
Tera TermでインスタンスにSSH接続して、opcユーザで色文字コマンドを実行・入力します。
3-1. VNC サーバーパッケージとすべての依存関係をインストール
[opc@test-instance01 ~]$ sudo dnf install -y tigervnc-server tigervnc-server-module
Last metadata expiration check: 0:08:22 ago on Thu 02 Oct 2025 02:28:49 AM GMT.
・・(略)

Installed:
dbus-x11-1:1.12.20-8.0.1.el9.x86_64
tigervnc-license-1.14.1-8.el9_6.noarch
tigervnc-selinux-1.14.1-8.el9_6.noarch
tigervnc-server-1.14.1-8.el9_6.x86_64
tigervnc-server-minimal-1.14.1-8.el9_6.x86_64
tigervnc-server-module-1.14.1-8.el9_6.x86_64

Complete!
[opc@test-instance01 ~]$
3-2. VNCのパスワード設定 ※VNC Viewerでログイン時にパスワード必須(別途メモ推奨)
[opc@test-instance01 ~]$ vncpasswd
Password:XXXX
Verify:XXXX
Would you like to enter a view-only password (y/n)? n #今回の検証では閲覧用パスワードなしで設定
A view-only password is not used
[opc@test-instance01 ~]$
3-3. opcユーザーのパスワード設定 ※VNC Viewerでログイン時にパスワード必須(別途メモ推奨)
[opc@test-instance01 ~]$ sudo passwd opc
Changing password for user opc.
New password:XXXX

Retype new password:XXXX

passwd: all authentication tokens updated successfully.
[opc@test-instance01 ~]$
4. VNCサービス構成
インスタンス
Tera TermでインスタンスにSSH接続して、opcユーザで色文字コマンドを実行・入力します。
4-1. VNC サービスのユーザーアカウントと X Server 表示をvncserver.usersファイルに追加
[opc@test-instance01 ~]$ echo ":1=$(whoami)"| sudo tee -a /etc/tigervnc/vncserver.users > /dev/null
[opc@test-instance01 ~]$
4-2. デフォルトのデスクトップと画面の解像度をvncserver-config-defaultsファイルに追加
[opc@test-instance01 ~]$ printf 'session=gnome\ngeometry=1280x1024' | sudo tee -a /etc/tigervnc/vncserver-config-defaults > /dev/null
[opc@test-instance01 ~]$
4-3. サービス再読み込み
[opc@test-instance01 ~]$ sudo systemctl daemon-reload
[opc@test-instance01 ~]$
4-4. VNC サーバーのサービス起動と起動確認
[opc@test-instance01 ~]$ sudo systemctl enable --now vncserver@:1.service
Created symlink /etc/systemd/system/multi-user.target.wants/vncserver@:1.service → /usr/lib/systemd/system/vncserver@.service.
[opc@test-instance01 ~]$
[opc@test-instance01 ~]$  ps -ef |grep 5901 ##vncサーバープロセスがport5901で動作していることを確認
opc 2368 2220 0 06:10 ? 00:00:00 xinit /etc/X11/xinit/Xsession gnome-session -- /usr/bin/Xvnc :1 -geometry 1280x1024 -auth /home/opc/.Xauthority -desktop test-instance01:1 (opc) -fp catalogue:/etc/X11/fontpath.d -pn -rfbauth /home/opc/.config/tigervnc/passwd -rfbport 5901
opc 2383 2368 0 06:10 ? 00:00:00 /usr/bin/Xvnc :1 -geometry 1280x1024 -auth /home/opc/.Xauthority -desktop test-instance01:1 (opc) -fp catalogue:/etc/X11/fontpath.d -pn -rfbauth /home/opc/.config/tigervnc/passwd -rfbport 5901
opc 7358 6395 0 06:11 pts/0 00:00:00 grep --color=auto 5901
[opc@test-instance01 ~]$
4-5. ファイアーウォール穴あけ
[opc@test-instance01 ~]$ sudo firewall-cmd --zone=public --add-service=vnc-server --permanent
success
[opc@test-instance01 ~]$ sudo firewall-cmd --reloadsudo firewall-cmd --reload
success
[opc@test-instance01 ~]$
5. Ultra VNC Viewerから接続
自身のPC
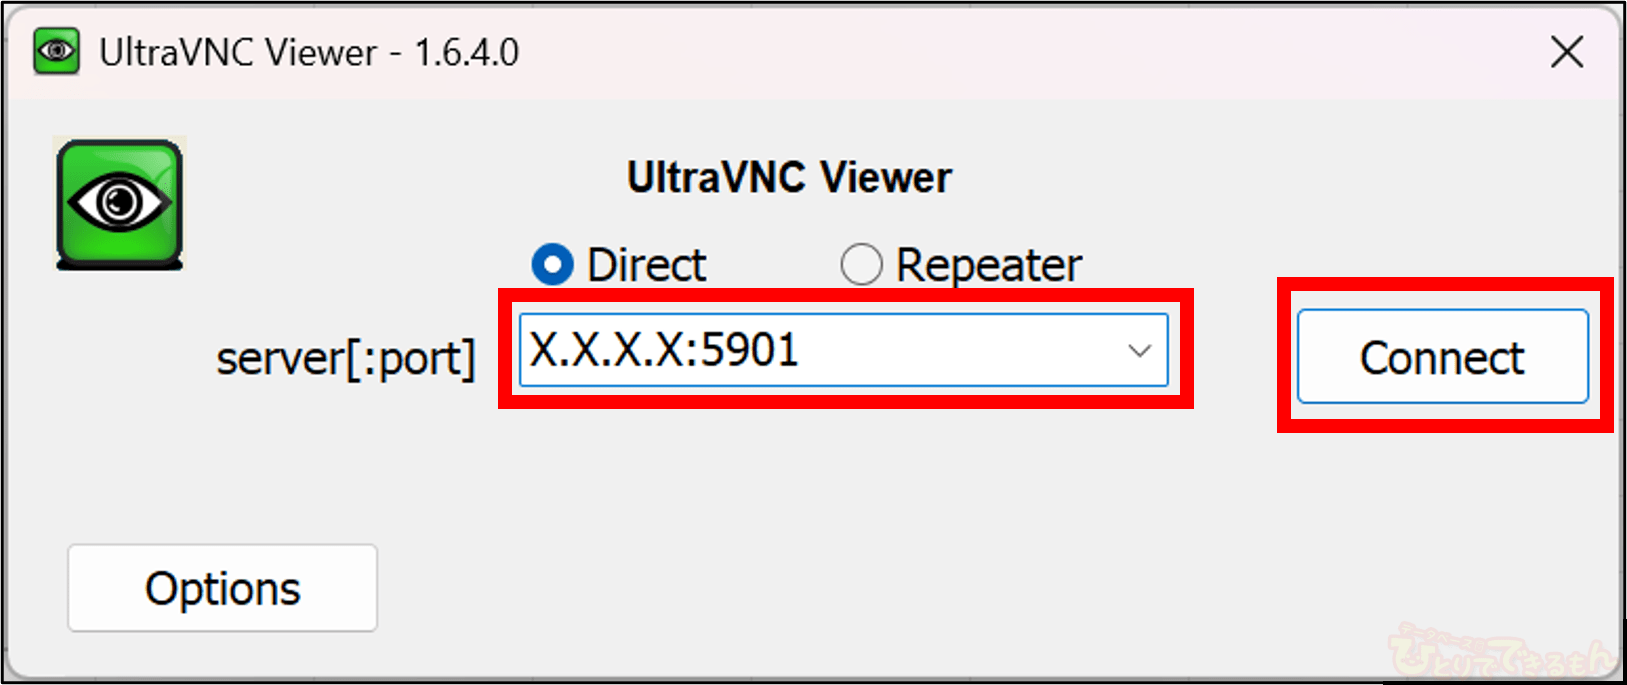
インストールしたUltra VNC Viewerを起動します。
5-1. 接続先を入力(<対象インスタンス パブリックIPアドレス>:5901)し、[Connect]をクリック
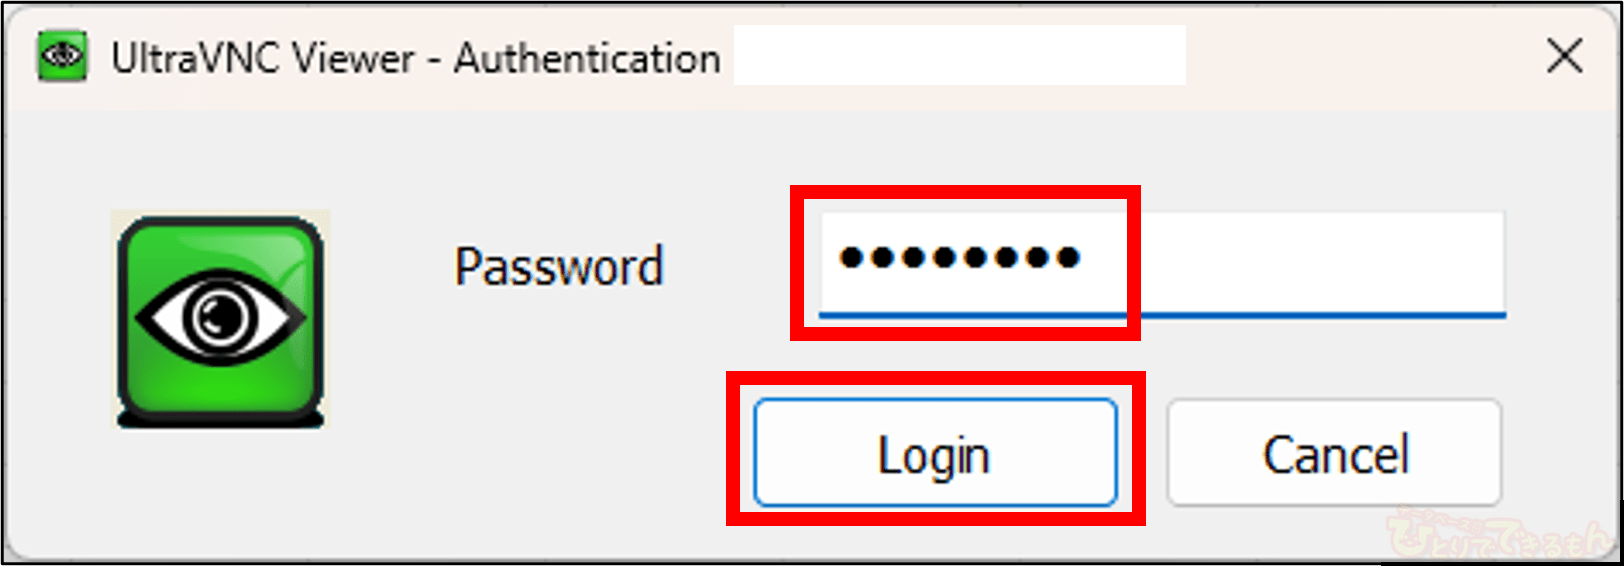
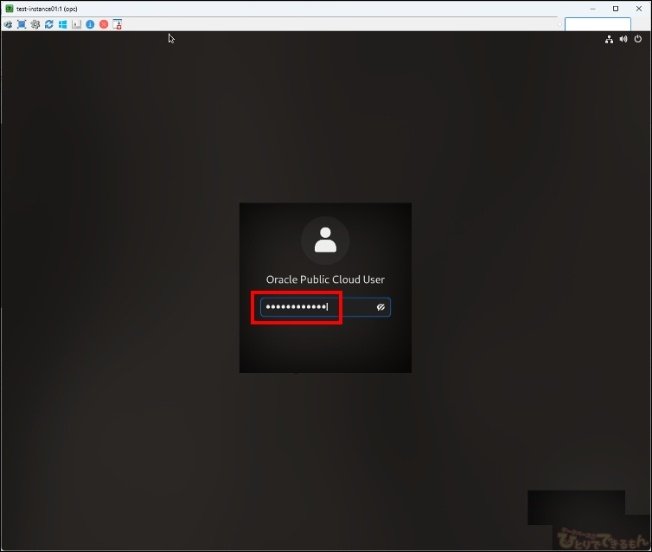
5-2. 「3-2. VNCのパスワード設定」で設定したパスワードを入力し、[Login]をクリック
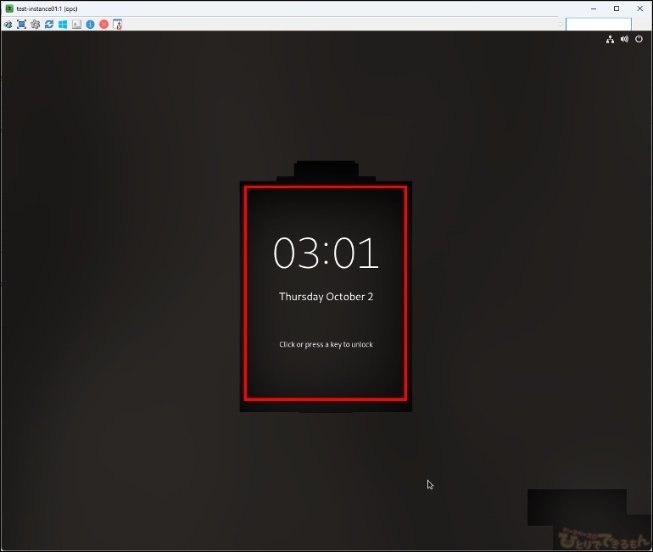
5-3. 日付等出力されている黒い画面が起動され、画面をクリックし「3-3. opcユーザーのパスワード設定」で設定したパスワードを入力、Enterを実行
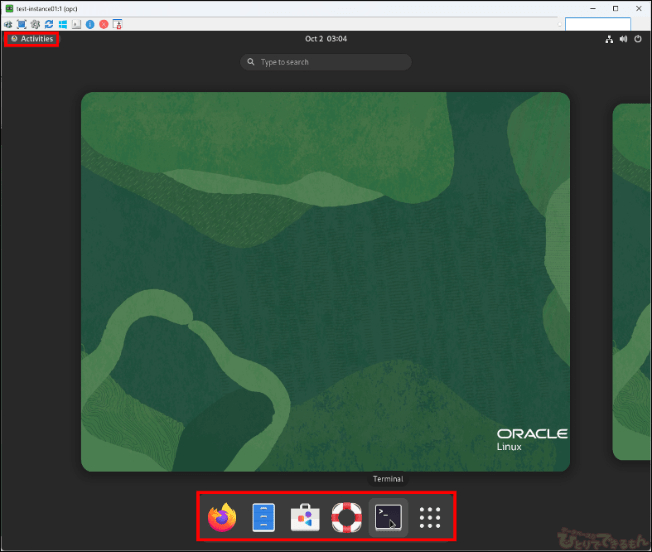
5-4. ログイン完了後[Activities]をクリックすると、ウェブブラウザのFireboxやTerminalが選択でき、GUI操作が可能になりました!!
(初回ログインはウェルカムダイアログが表示)
おわりに
Ultra VNC Viewerを使ってOCIに構築したOracle Linux 9をGUI操作できるようにしてみました。
ツールをインストールする等でLinux環境でGUIが必要な場合は、是非参考にしてみてください。
\Oracle Datebaseでお困りならプロを頼りましょう!/
| Oracle関連のお悩みは弊社にお任せください |
|---|
| ・Oracle関連の資格保持者ばかりのプロ集団 ・オラクル社から何年にも渡りAwardを受賞 ・導入実績多数の安心感 |
投稿者プロフィール
-
DBひとりでできるもんを盛り上げるべく、技術チームが立ち上がり早8年。ひとりでできるもんと言いつつ、技術者が読んでプッとなるような、極めてピンポイントでマニアックな技術ネタを執筆しています!
最新技術情報や資格情報をチェックしたいアナタ!毎日遊びに来てください。きっとお役に立てます。
最新の投稿
 Oracle2026年1月15日PDBホットクローンを作成してみました
 23ai2026年1月13日Oracle AI Database 26ai Free–Developer Releaseを使ってみた!
 Oracle2025年12月25日OCIへの移行を検証してみた その2 ADBへの移行(Datapump)
 Oracle2025年12月22日AWRレポートで始める性能分析 -Part1 AWRレポートの取得方法-