はじめに
こんにちは。
STSに中途入社して2年目のエンジニアです。
いつもDBひとりでできるもんをご愛読頂きありがとうございます。
色んな方がこのページをご覧になっているかと思いますが、
今回は監視ツール「Zabbix 6.4」を構築してみました!
DBひとりでできるもんではちょっと珍しい、Zabbixに関する記事です。
当事業部はOracleDatabaseを得意とする集団ですが、実はインフラにも強いチームもあるのです。
インフラエンジニアのお仕事記事も是非あわせてご覧くださいね。
当該事業部員はOracle VM Manager サーバ構築についての記事も執筆しています!是非ご覧下さいね。

そもそもZabbixとは?
Zabbixとは
サーバー、ネットワーク、アプリケーションを集中監視するためのオープンソース統合監視ソフトウェアです。
統合監視に必要な監視、障害検知、通知機能を備えています。
多数のプラットフォームに対応した Zabbix エージェントと SNMP に対応しているため、システム全体を Zabbix ひとつで監視することが可能です。
概要
前回リリースのZabbix 6.2から7ヶ月ぶりのリリースとなります。
自身としては、今まで携わってきたバージョンが3.0だったので
グラフィックが変わっていて大幅にアップデートされている印象を受けました。
Zabbix 6.4 の新機能と変更点
以下の公式ドキュメントをご参照ください。
※Zabbix 6.4 では、MySQL 8.0.30 未満のバージョンはサポートされなくなりました。
今回は変更点ではなく、構築にフォーカスしてお話していきます!
インストール構成
下記のような構成で進めていきます。
| OS | Red Hat Enterprise Linux release 9.2 |
|---|---|
| DB | MySQL 8.0.32 |
| ミドルウェア | PHP(8.0.30)、apache(2.4.53) |
| 監視ソフト | zabbix-agent(6.4.8)、zabbix_server(6.4) |
インストール手順
- mysqlパッケージインストール
[root@OL9 ~]# dnf -y install mysql
- mysql-serverパッケージ
[root@OL9 ~]# dnf -y install mysql-server
- mysqlバージョン確認
[root@OL9 ~]# dnf info mysql-server
メタデータの期限切れの最終確認: 0:29:32 前の 2023年11月11日 16時30分34
秒 に実施しました。

インストール済みパッケージ
名前           : mysql-server
バージョン     : 8.0.32
リリース        : 1.el9_2
Arch            : x86_64
サイズ           : 107 M
ソース           : mysql-8.0.32-1.el9_2.src.rpm
リポジトリー     : @System
repo から        : ol9_appstream
概要             : The MySQL server and related files
URL              : http://www.mysql.com
ライセンス       : GPLv2 with exceptions and LGPLv2 and BSD
説明             : MySQL is a multi-user, multi-threaded SQL database server. MySQL is a

            : client/server implementation consisting of a server daemon (mysqld)

                 : and many different client programs and libraries. This package contains

                 : the MySQL server and some accompanying files and directories.
- mysqlタイムスタンプをシステム時間へ変更
(デフォルト:UTCで日本時間9時間ずれ)
[root@OL9 ~]# cd /etc/my.cnf.d/ [root@OL9 my.cnf.d]# ls -l 合計 8 -rw-r--r-- 1 root root 295 5月 9 2022 client.cnf -rw-r--r-- 1 root root 612 5月 12 2023 mysql-server.cnf [root@OL9 my.cnf.d]# cp -ip mysql-server.cnf mysql-server.cnf.org [root@OL9 my.cnf.d]# ls -l mysql-server.cnf.org -rw-r--r-- 1 root root 612 5月 12 2023 mysql-server.cnf.org [root@OL9 my.cnf.d]# [root@OL9 my.cnf.d]# [root@OL9 my.cnf.d]# vi mysql-server.cnf ⇒log_timestamps=SYSTEM★追加 [root@OL9 my.cnf.d]# diff mysql-server.cnf mysql-server.cnf.org 18c18 < log_timestamps=SYSTEM --- > - MySQLサービス起動
[root@OL9 my.cnf.d]# systemctl start mysqld
[root@OL9 my.cnf.d]# systemctl status mysqld
- MySQLのrootユーザーのスワードを設定
[root@OL9 my.cnf.d]# mysql_secure_installation

Securing the MySQL server deployment.

Connecting to MySQL using a blank password.

VALIDATE PASSWORD COMPONENT can be used to test passwords
and improve security. It checks the strength of password
and allows the users to set only those passwords which are
secure enough. Would you like to setup VALIDATE PASSWORD component?

Press y|Y for Yes, any other key for No:
Please set the password for root here.

New password:★パスワードを8文字以上で英数大文字小文字で設定します。

Re-enter new password:★再入力します。
By default, a MySQL installation has an anonymous user,

allowing anyone to log into MySQL without having to have
a user account created for them. This is intended only for
testing, and to make the installation go a bit smoother.
You should remove them before moving into a production
environment.

Remove anonymous users? (Press y|Y for Yes, any other key for No) :y
★誰でもログインできる状態のanonymousユーザ削除

Success.

Normally, root should only be allowed to connect from
'localhost'. This ensures that someone cannot guess at
the root password from the network.
Disallow root login remotely? (Press y|Y for Yes, any other key for No) :y
★リモートからのrootログイン設定無効化
Success.

Remove test database and access to it? (Press y|Y for Yes, any other key for
No) :y ★testデータベースの削除
- Dropping test database...
Success.

Reload privilege tables now? (Press y|Y for Yes, any other key for No) :y
★上記設定による権限の変更等を即時反映
Success.
All done!
- Zabbix 6.4 のリポジトリを登録
[root@OL9my.cnf.d]# rpm –Uvh
https://repo.zabbix.com/zabbix/6.4/rhel/9/x86_64/zabbix-release-6.4-
1.el9.noarch.rpm
- zabbix関連パッケージインストール
[root@OL9 my.cnf.d]# dnf -y install zabbix-server-mysql zabbix-web-mysql
zabbix-apache-confdnf -y install zabbix-server-mysql zabbix-web-mysql
zabbix-apache-conf
[root@OL9 my.cnf.d]# dnf -y install zabbix-sql-scripts
[root@OL9 my.cnf.d]# dnf -y install zabbix-selinux-policy
[root@OL9 my.cnf.d]# dnf -y install zabbix-agent
[root@OL9 my.cnf.d]# dnf -y install zabbix-web-japanese
[root@OL9 my.cnf.d]# dnf -y install zabbix-get
- Zabbix用ユーザー作成
[root@OL9 ~]# mysql -u root -pmysql -u root -p
Enter password:
mysql> create database zabbix character set utf8mb4 collate utf8mb4_bin;
Query OK, 1 row affected (0.00 sec)
mysql> create user zabbix@localhost identified by 'xxxxxx';
Query OK, 0 rows affected (0.03 sec)
mysql> grant all on zabbix.* to zabbix@localhost;
Query OK, 0 rows affected (0.01 sec)

mysql> set global log_bin_trust_function_creators = 1;
Query OK, 0 rows affected (0.00 sec)

mysql> quit;
Bye
- Zabbix用のデータインポート
[root@OL9 ~]# zcat /usr/share/zabbix-sql-scripts/mysql/server.sql.gz |
mysql --default-character-set=utf8mb4 -u zabbix -p zabbix

Enter password: --zabbixのパスワードを入力)

★インポートが終わったら「log_bin_trust_function_creators = 0」に戻します。
[root@OL9 ~]# mysql -u root -p
Enter password: ←(MySQLのユーザー「root」のパスワードを入力)

mysql>set global log_bin_trust_function_creators = 0;
mysql>quit;
- Zabbixサーバーの設定
[root@OL9 ~]# cd /etc/zabbix//etc/zabbix/
[root@OL9 zabbix]# ls -l
[合計 48
[drwxr-xr-x 2 apache apache    33 11月 11 17:11 web
[-rw-r--r-- 1 root   root   17204 10月 31 19:45 zabbix_agentd.conf
[drwxr-xr-x 2 root   root       6 10月 31 19:45 zabbix_agentd.d
[-rw------- 1 root   zabbix 27348 10月 31 19:45 zabbix_server.conf

[root@OL9 zabbix]# cp -ip zabbix_server.conf zabbix_server.conf.org
[root@OL9 zabbix]#
[root@OL9 zabbix]# ls -l zabbix_server.conf.org
-rw------- 1 root zabbix 27348 10月 31 19:45 zabbix_server.conf.org
[root@OL9 zabbix]# vi /etc/zabbix/zabbix_server.conf
"/etc/zabbix/zabbix_server.conf"
# This is a configuration file for Zabbix server daemon
# DBUser=DBUser=zabbix

### Option: DBPassword
#       Database password.
#       Comment this line if no password is used.
#
# Mandatory: no
# Default:
# DBPassword=

DBPassword=xxxxxxx --パスワードを設定します。
[[root@OL9zabbix]# diff
/etc/zabbix/zabbix_server.conf/etc/zabbix/zabbix_server.conzabbix_serv
er.confzabbix_server.conf zabbix_server.confzabbix_server.conf.org
[131d130
[< DBPassword=xxxxxxx ★追加差分
- Zabbix サーバーの起動
[root@OL9 zabbix]# systemctl start zabbix-server
- 自己署名の SSLサーバー証明書の作成
[root@OL9 conf]# dnf install mod_ssl
[root@OL9conf]# mkdir -p /etc/httpd/ssl/private
[root@OL9 conf]# chmod 700 /etc/httpd/ssl/private
- 秘密鍵の作成
[root@OL9conf]#openssl ecparam -name prime256v1 -genkey -out
server.key

※CSR(証明書署名要求)の作成(入力するのは Country Name と Common Name
の2箇所だけです)
[root@OL9conf]# openssl req -new -key server.key > server.csr

Country Name (2 letter code) [XX]:JP★追加
State or Province Name (full name) []:
Locality Name (eg, city) [Default City]:
Organization Name (eg, company) [Default Company Ltd]:
Organizational Unit Name (eg, section) []:
Common Name (eg, your name or your server's hostname) []:zabbix.example.com★追加
Email Address []:

Please enter the following 'extra' attributes
to be sent with your certificate request
A challenge password []:
An optional company name []:
- SSLサーバー証明書の作成
[root@OL9conf]# openssl x509 -days 10950 -req -signkey server.key <
server.csr > server.crt
- 秘密鍵とSSLサーバー証明書を移動
[root@OL9conf]# mv -i server.key /etc/pki/tls/private/
[root@OL9conf]# mv -i server.crt /etc/pki/tls/certs/
- パーミッションを変更
[root@OL9conf]# chmod 600 /etc/pki/tls/private/server.key
[root@OL9conf]# chmod 600 /etc/pki/tls/certs/server.crt

[root@OL9 conf.d]# vi ssl.conf
[root@OL9 conf.d]# diff ssl.confssl.conf vi ssl.confls -l ssl.conf.org
[root@OL9 conf.d]# cp -ip ssl.conf ssl.conf.orgdiff
43,44c43,44
< DocumentRoot "/var/www/html"★追加差分
< ServerName www.example.com:443★追加差分
---
> #DocumentRoot "/var/www/html"
> #ServerName www.example.com:443
< SSLCertificateFile /etc/httpd/ssl/apache-selfsigned.crt★追加差分

---
> SSLCertificateFile /etc/pki/tls/certs/localhost.crt
< SSLCertificateKeyFile /etc/httpd/ssl/private/apache-selfsigned.key★追加
差分
---
> SSLCertificateKeyFile /etc/pki/tls/private/localhost.key

[root@OL9 conf.d]# vi httpd.conf
    ★以下内容を最下位へ追加
<VirtualHost *:80>
     ServerName 127.0.0.1
     Redirect permanent / https://zabbix.example.com/
</VirtualHost>

<VirtualHost *:*>
  ServerName example.com
      Redirect permanent / https://example.com
</VirtualHost>
    ★以下内容を最下位へ追加
- Apache再起動
[root@OL9 conf]# systemctl restart httpd.servicestatus httpd
- PHP の設定と起動
[root@OL9 etc]# cp -ip php.ini php.ini.org [root@OL9 etc]# ls -l php.ini.org -rw-r--r-- 1 root root 62625 10月 20 18:56 php.ini.org [root@OL9 conf]# vi /etc/php.ini ⇒以下内容へ変更します。 expose_php = On date.timezone = 'Asia/Tokyo' [root@OL9 etc]# diff php.ini php.ini.org 400c400 < expose_php = Off --- > expose_php = On < date.timezone ='Asia/Tokyo' --- > ;date.timezone = - php-fpm起動
[root@OL9 etc]#systemctl start php-fpm
- Zabbix エージェントの起動と動作確認
[root@OL9 etc]# systemctl start zabbix-agent
- Zabbix エージェントの動作確認
[root@OL9 conf]# zabbix_get -s 127.0.0.1 -k agent.version
6.4.0
- Zabbixコンソールセットアップ
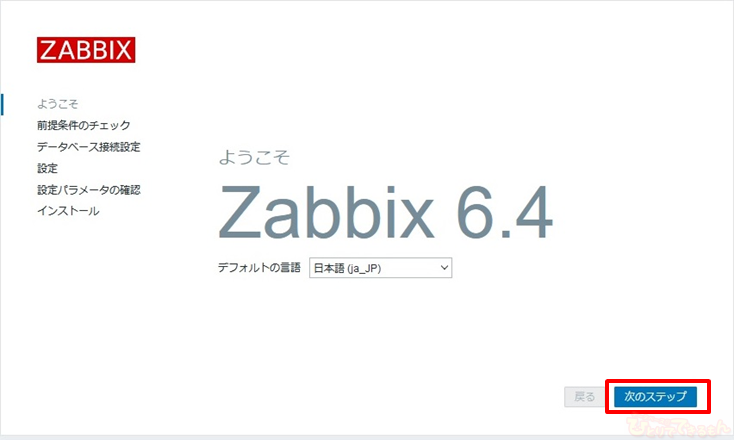
- ZabbixコンソールのURLへアクセスします。
アクセスURL:https://zabbix.example.com/zabbix/
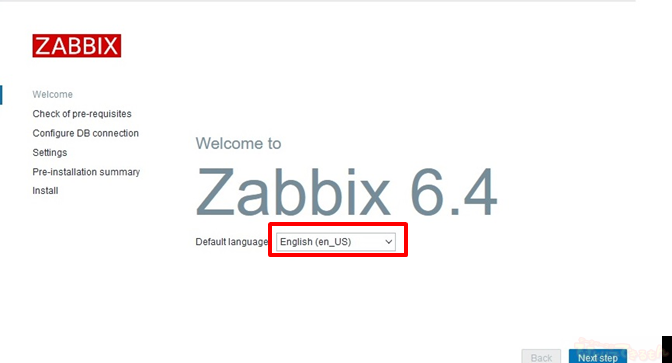
※zabbix.example.comはサーバのIPアドレスを指定することでもアクセスできます。日本語で設定しますので Default language「Japanese(ja_JP)」を選択します。
- 「Japanese(ja_JP)」を選択日本語になりますので、次のステップを押します。
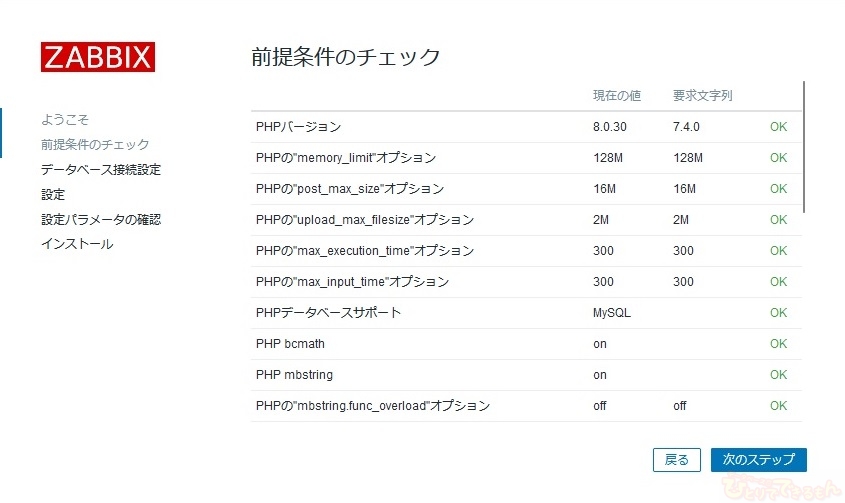
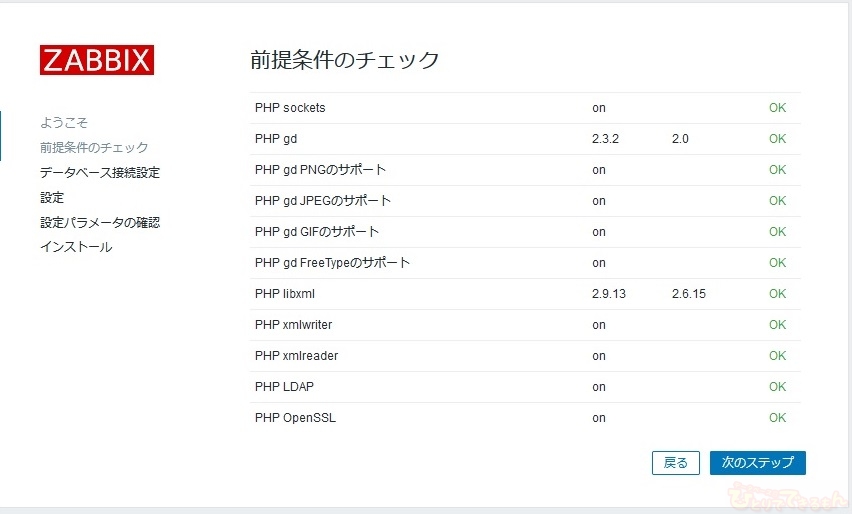
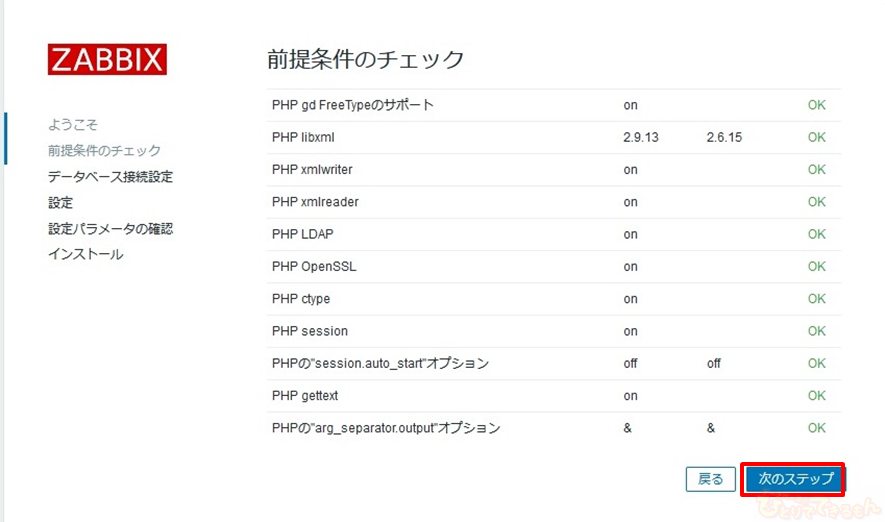
- 前提条件のチェックのステータスがすべて「OK」であることを確認し、次のステップを
押します。
ページ①
ページ②
ページ③
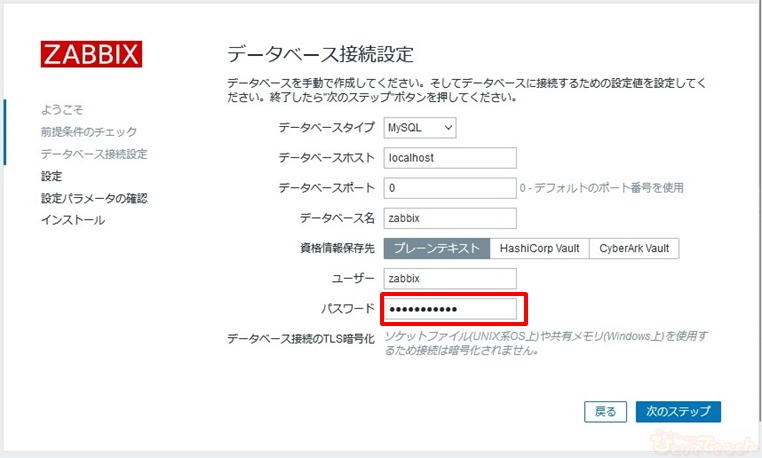
- パスワードにMySQLのユーザー(zabbix)のパスワードを入力し「次のステップ」を押します。
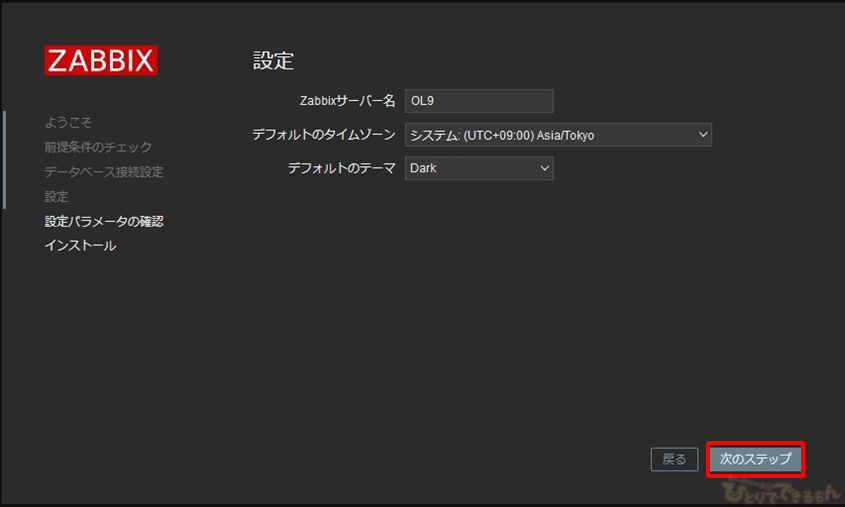
バー名を入力、デフォルトタイムゾーン「Asia/Tokyo」を選択し、
- デフォルトのテーマを選択したら「次のステップ」を押します。
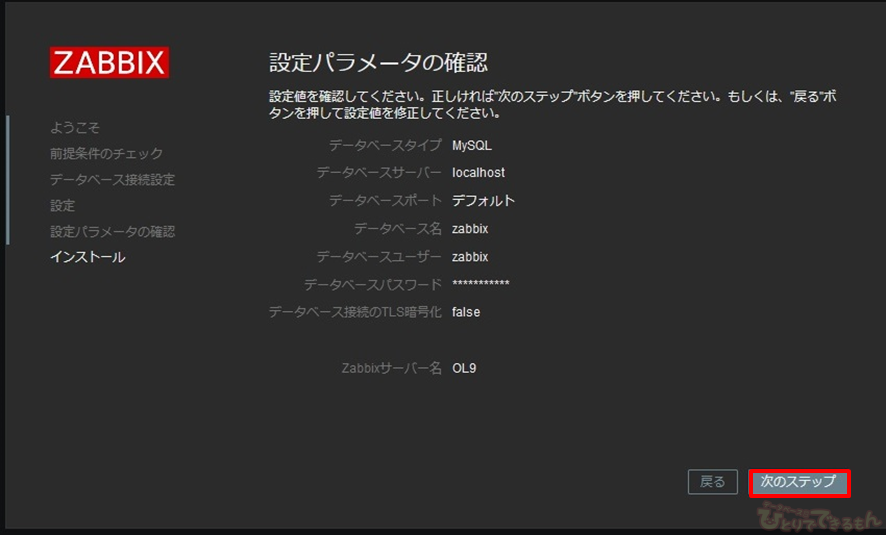
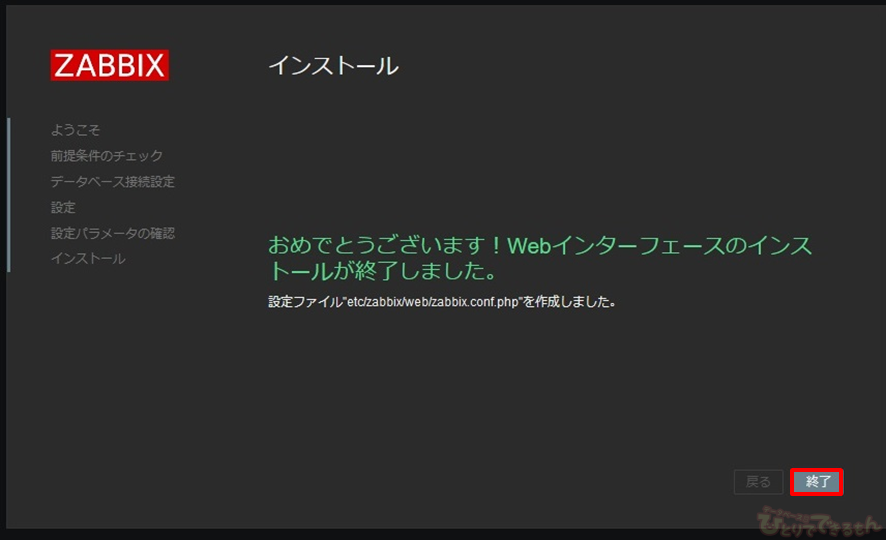
- 設定した内容のサマリーが表示されますので、問題なければ次のステップを押します。
- 終了を押します。以上で完了です。
- ZabbixコンソールのURLへアクセスします。
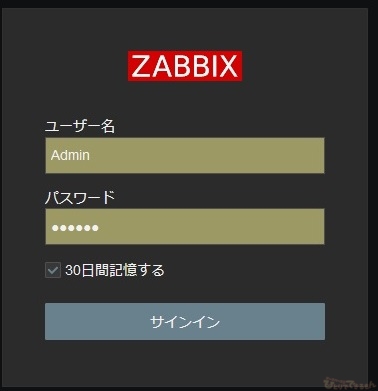
- コンソールログイン
初期パスワードは以下となります。
パスワード変更する場合は、メニュー下部の [ユーザー設定]→[プロファイル] から「パスワード変更」をクリックします。【ログイン情報】
ユーザー名:Admin
パスワード:zabbix
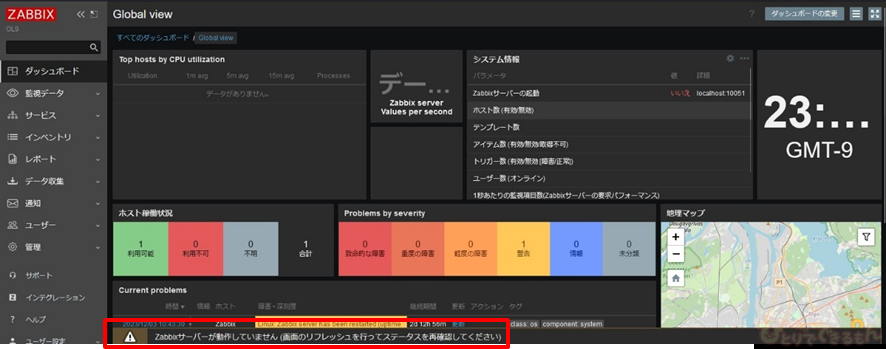
- 【zabbixサーバが起動していない場合】
⇒赤枠のメッセージが表示されます。
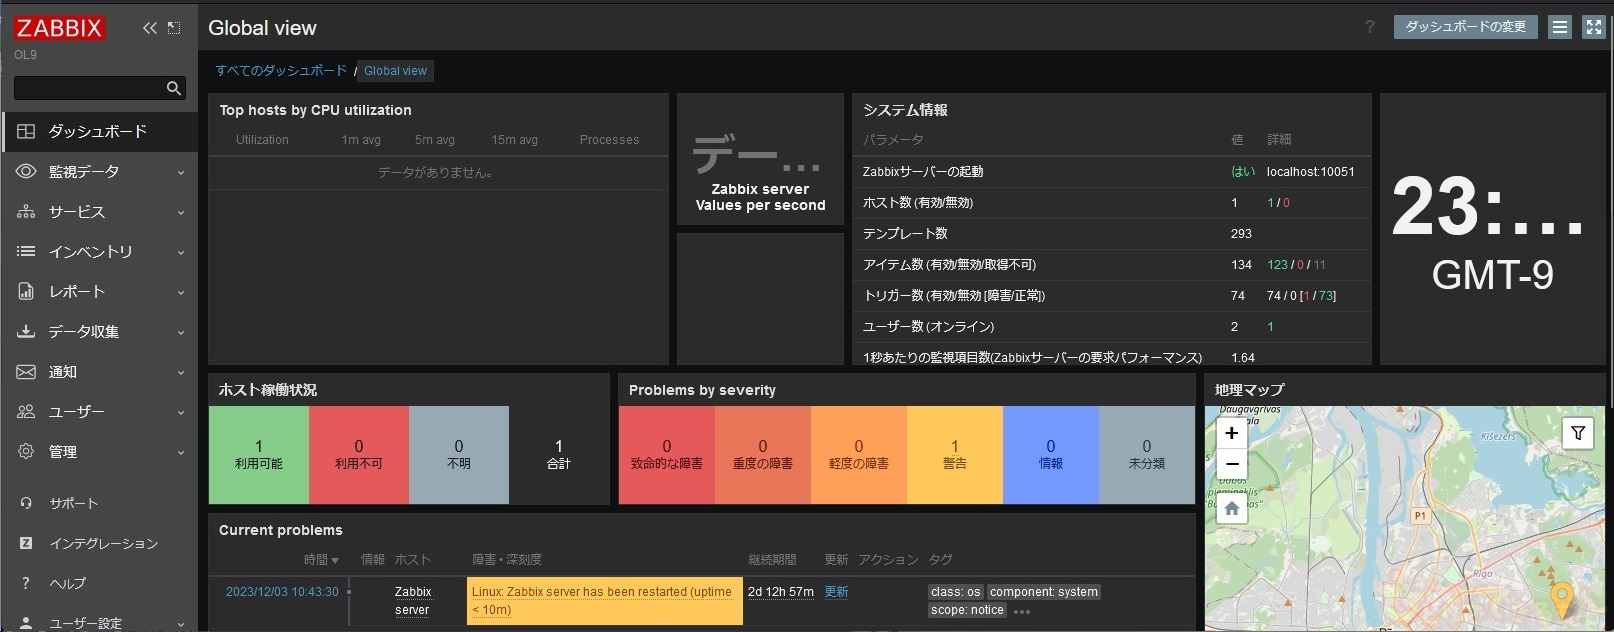
- 【正常にログインできた場合】
⇒メッセージも何も表示されずに以下コンソールが表示されます。
- 【zabbixサーバが起動していない場合】
zabbixサーバのインストールは以上になります。
いかがでしたでしょうか?
技術的なお問い合わせや購入に関して、またご興味を持たれたことがございましたらお気軽に当社までお問い合わせください!
投稿者プロフィール

 Oracle Cloud2024年4月18日OCI ブロック・ボリュームをクローニングしてみよう!
 Dbvisit Standby2024年3月29日【Dbvisit Standby】Dbvisit Software Limited 様と対談致しました 第4弾 世界の面白ウェビナー、新しいお客様達へ
- Dbvisit Standby2024年3月21日【Dbvisit Standby】Dbvisit Software Limited 様と対談致しました 第3弾 グローバルスタンダードなDbvisit StandbyMP(最大規模のデータベース)
- Dbvisit Standby2024年3月12日【Dbvisit Standby】Dbvisit Software Limited 様と対談致しました 第2弾 FSDRの魅力 と FSDRにDbvisit Standbyがエントリーされます
アナタにおすすめのこちらの関連記事も読んでみませんか?
 Oracle Cloud Infrastructure 2022 Certified Architect Professional を取得しました!
 【再掲載】Oracle Database Cloudはこんな風に作ります!前編(2017年11日8日現在)
 OCIのファイルストレージサービスを(FSS)利用して、共有ネットワークボリュームを作成してみました
 ORACLE MASTER Bronze Oracle Database 12cを取得しました!
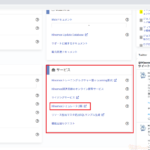 【Hinemos】Hinemosシミュレータ(β版)について
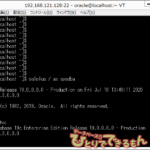 【再掲載】DB停止起動ひとりでできるもん(制御ファイル破壊編)
 【Dbvisit Standby MultiPlatform】Dbvisit Standby がSQL Serverに対応しました!